Are you tired of struggling with sublimation transfers, unsure of the correct layering technique to achieve vibrant and flawless results? Are you overwhelmed by the variety of sublimation blanks and unsure of the best approach for each one? Fear not, fellow crafters, for I’m here to demystify the process and empower you with the knowledge to master sublimation like a seasoned pro.
As a beginner crafter venturing into the world of sublimation, or even as an experienced enthusiast encountering challenges along the way, it’s easy to feel frustrated and overwhelmed by the intricacies of the process. From selecting the right blanks to mastering the art of layering transfers, every step presents its own set of challenges. But fear not, for with the right guidance and techniques, you’ll soon be creating stunning sublimated creations with confidence and ease.
Understanding the Importance of Proper Layering:
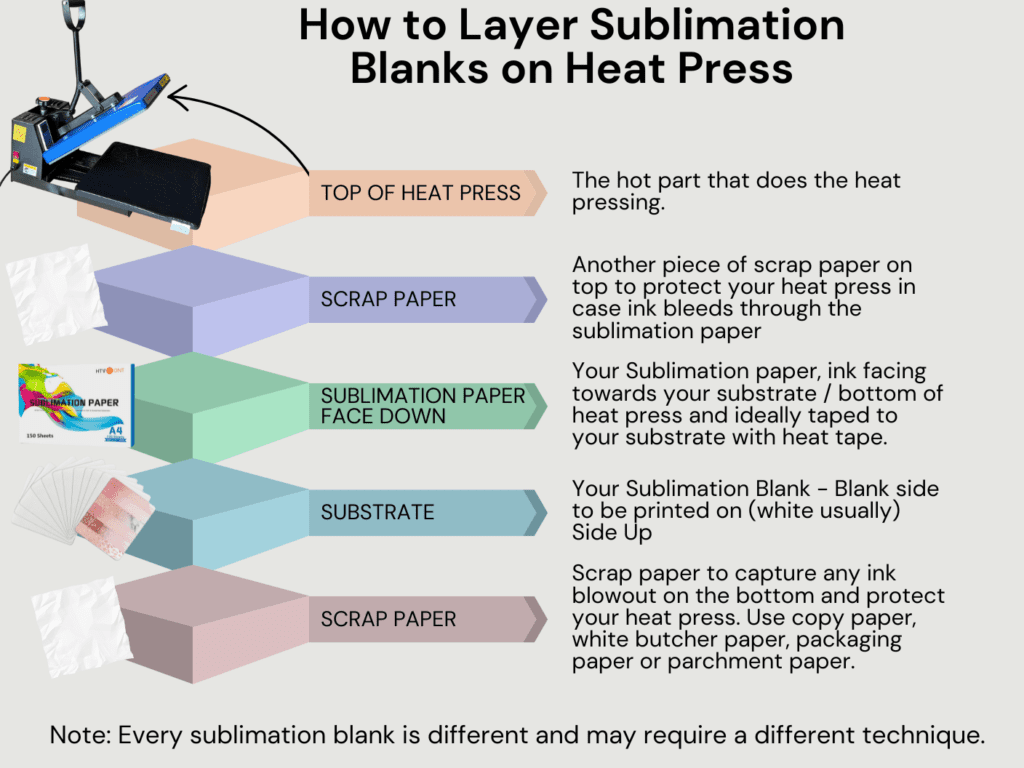
Before we dive into the step-by-step process of layering your sublimation transfers, let’s understand why each part of this technique is crucial for achieving optimal results:
- Scrap Paper Bottom:
Placing scrap paper at the bottom of your heat press serves as a protective barrier, preventing any stray ink or residue from transferring onto your press or other items. It also helps in absorbing excess moisture, ensuring a clean and crisp transfer. - Blank Face Up:
Positioning your sublimation blank face up allows for easy alignment and ensures that the printable surface is ready to receive the transfer. It’s essential to handle your blanks with care to avoid any smudges or fingerprints that may interfere with the transfer process. - Transfer Paper Face Down:
Placing the sublimation transfer paper face down towards the printable part of the blank ensures that the ink is transferred onto the surface with precision and accuracy. Proper alignment and pressure are key to achieving vibrant and crisp images. - Scrap Paper Top:
Similar to the scrap paper at the bottom, placing another layer of scrap paper on top of the transfer paper serves as an additional protective barrier. It helps in evenly distributing heat and pressure across the transfer, resulting in uniform and consistent results.

The Step-by-Step Layering Technique:
Now that we’ve covered the importance of proper layering, let’s walk through the step-by-step process of layering your sublimation transfers like a pro:
- Place a sheet of scrap paper at the bottom of your heat press to protect the press and absorb excess moisture.
- Position your sublimation blank face up on the scrap paper, ensuring it’s centered and secure.
- Place the sublimation transfer paper face down onto the printable part of the blank, aligning it with precision.
- Add another layer of scrap paper on top of the transfer paper to provide additional protection and aid in heat distribution.
- Close the heat press gently and apply the recommended time, temperature, and pressure settings for your specific sublimation transfer and blank.
- Once the pressing cycle is complete, carefully remove the layers of scrap paper and transfer paper to reveal your vibrant and crisp sublimated creation.
Remember, Every Blank is Different:
While this layering technique works for the majority of sublimation blanks, it’s essential to remember that each blank may require a slightly different approach. Experimentation and practice are key to finding the optimal settings and techniques for your specific blanks. Don’t be afraid to try new methods and adjust your process as needed to achieve the best results. Here are some of my favorite blanks you can easily score on Amazon: Ryan’s Favorite Amazon Sublimation Blanks
Conclusion:
As you embark on your sublimation journey, remember that mastering the art of layering transfers is a crucial step towards unlocking your full creative potential. With patience, practice, and the right techniques, you’ll soon be creating stunning sublimated masterpieces that dazzle and delight. So, roll up your sleeves, embrace the process, and let your creativity soar. Happy sublimating, fellow crafters! 🎨✨
Affiliate Disclosure: Ryan Can Make It is a participant in Amazon Affiliate and other affiliate programs. I earn a small commission from Amazon links and some other links posted on this website.


