Hey there, my fellow crafters! I recently made a trip to Dollar Tree with a mission: to discover some budget-friendly items that could be turned into sublimation wonders. If you’re anything like me, you’re always on the lookout for creative ways to use sublimation without breaking the bank. So, today I’m sharing my top 3 Dollar Tree sublimation hacks that you absolutely need to try!
Supplies You Might Need:
- Mushroom Design Doodle Letters: https://creatoriq.cc/3Sv45xi
- Laminating Sheets: https://amzn.to/4d2lwO5
- Hot Glue Gun: https://amzn.to/3WM8yhN
- Good Scissors: https://amzn.to/3Wvg2V3
- Fancier Studio 15″ x 15″ Heat Press: https://amzn.to/3UrbBeq
- HTVRONT Sublimation Paper: https://amzn.to/3T0jIxz
- Yellow Heat Tape: https://amzn.to/48hsgo8
- Packaging Paper (for blow out): https://amzn.to/49j7YeU
- Pink Heat Resistant Gloves: https://amzn.to/3SqJsRW
- Black Disposable Gloves: https://amzn.to/3uB8C8C
- Sawgrass Sublimation Printer: http://shrsl.com/4eqeo
- F FINDERS&CO SG400 SG800 Ink Cartridges: https://amzn.to/42K0Aaj
1. Holographic Notebook Sublimation:
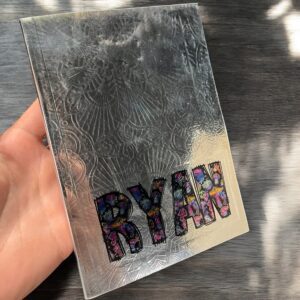
Remember those holographic spiral notebooks you saw years ago? They were all the rage for back-to-school season. Well, I finally got my hands on one during my Dollar Tree run, but it wasn’t a spiral notebook— it was a glued-edge one. Challenge accepted!
I picked up a gorgeous holographic notebook and paired it with some cute doodle letters from Etsy, find them here. I used my Fancierstudio 15×15 heat press set at 385°F for 60 seconds to press the design onto the notebook. And guess what? It worked like a charm—sort of. 😅
The one hiccup? The glue holding the pages together started to melt and ooze out as I pressed it. To fix this, I quickly pressed the pages back into the glue and placed the notebook under something heavy to cool down. Despite the minor mishap, the finished product looked fantastic-ish!

2. Canvas Art: Laminate and Sublimate!
For my next project, I used a hack that involves laminate—yes, the same stuff you’d use for protecting school documents. First, I got a canvas with a cute little easel from Dollar Tree. I removed the staples from the canvas frame, pressed it flat on my heat press (without laminate) to smooth it out, and then got to work.
Here’s how it went down: I placed a piece of scrap paper on the bottom, laid down the canvas, then applied laminate on top (matte side down, glossy side up), then the sublimation transfer on top of that, and finally another piece of scratch paper on top. I pressed this sandwich at 385°F for 60 seconds. The result? A glossy, vibrant canvas art piece! 🖼️
To give it a rustic vibe, I hot-glued the canvas back onto the original frame and then trimmed the edge of the canvas to fit with scissors. I chose a sweet photo of my dog, but you can use any image you like. It’s perfect for adding a personal touch to your decor.

3. Dry Erase Board Magic: Transforming with Laminate
Last but not least, I tackled an easel dry erase board from Dollar Tree. To start, I pressed the board alone at 385°F for 30-60 seconds to remove any moisture—wood often retains a lot of moisture that can prevent the laminate from sticking properly.
Next, I cut a piece of laminate to size and pressed it onto the board for 30 seconds at 385°F. After it cooled, I carefully trimmed the edges with an X-Acto knife.
For the fun part, I created a “Today’s Deal” graphic in Canva, leaving a space for writing with a dry-erase marker. I taped the sublimation transfer to the laminated board and pressed it for 60 seconds at 385°F. The result was fantastic—my new dry erase board looked amazing and is now ready for craft fairs and vendor events!

Wrap-Up
These Dollar Tree sublimation hacks were a blast to try, and they didn’t break the bank! I’m especially smitten with the dry erase board—it’s practical and cute. For the full visual experience and more details, be sure to check out my YouTube video. And if you haven’t already, hit that subscribe button for more crafty inspiration and DIY fun!
Happy crafting, and see you in the next post!
— Ryan 🌟
Affiliate Disclosure: Ryan Can Make It is a participant in Amazon Affiliate and other affiliate programs. I earn a small commission from Amazon links and some other links posted on this website.


